Acrylic Painting Demonstration #1

I made my first acrylic painting demonstration and it was so much fun! Short and sweet, click through to check it out.

I LOVE watching painting demos online.  Just ordinary everyday artists in the groove, making it happen–it’s fun to watch because  I love seeing new techniques, hearing their commentary and listening to how they end up making the choices they make.  Kind of like life, the journey is the best part.  I feel like no matter how long I’ve painted or what I’ve learned, there’s always more to know and painting demos help me get there!

Anyway, so after watching a looooot of demos, I decided to try to make one myself.  And you know what?  It was so much fun.  You know what else? I only painted for 10 minutes, took one take of the video and called it a day. So the best part of all of this is that it didn’t take forever to do.  YOU GUYS IT WAS FAST AND EASY!  And you can do it too!

Ok, so you can take a peek at the video below.  I’m posting it in my FB group too, so if you want to give me some feedback, hop on over there and join us in the conversation.  Do you want to see more of these?  Tell me.

Love, Steph

PS: Come join my Facebook Group for Creatives HERE.  We can’t wait to meet you!

Acrylic Painting Demonstration #12018-03-29T20:23:05-04:00

The Creative Process: What Works For Me

Want a peek into the creative process I use? Click through to read more--It may help you discover your own.

Does the creative process elude you?  I remember when I started taking my painting class, my teacher spoke about his creative process and how it was an integral part of producing actual work.  Because let’s face it, even when you have the time to sit and get to work, the inspiration isn’t always there.  This is where the creative process can jump start things!  Most days I have to refer to a few tricks to make the most of my time when I’m trying to get in the zone.

It wasn’t so obvious to me what my process was in the beginning, though. I had to almost step back and watch what I did as I did it, to figure out how I created my own inspiring environment.

So if you’re not sure of your own creative ways, don’t worry!  I have a few tips to help you figure it out.  The main idea is to focus on the 5 senses: it will help you be really present in the moment and ready to embrace whatever comes up.

[magicactionbox id=”8032″]

Here is a peek into my creative process and how I use each of the senses:

Sight: I like to be in an environment with visual stimulation to keep the juices flowing.  This can be sketchbooks I keep open to look at now and again for ideas, previous paintings on the wall or some other artist’s work in Instagram that gives me some ideas to adapt into my own. I usually paint in my studio (which is also a spare bedroom right now) so I like to have a lot of color around me to keep me loose and brave.

Hearing: Music playing helps me get out of my own way. I heard once that when you play music while you are creating, it turns off that left brain so that the ideas flow easier.  That makes so much sense, right? The inner critic is silenced a little easier.

Taste: A drink and a little snack nearby helps me keep going so I’m not interrupted!  I love my snacks 🙂  And no one likes to stop the flow in the middle of a good idea.

Touch: I love to keep my supplies within arm’s reach so I can experiment with different markings and materials.  If I don’t have to dig through clutter or an overwhelming amount of supplies. I create more easily.  (That’s probably true for most of us.)  I have standby favorite supplies. but I also like to keep unlikely tools around to mix things up. (spray bottle, bubble wrap, baby wipes etc)

Smell: I once saw a video of  Flora Bowley where she prepped her canvas with a smudging stick.  She said the smell of the smoke and the energetic clearing of the space helped her get focused.  I love this!  I tend to use a candle, but it has the same effect. Smells can bring up a lot of memories, so I make sure the scent is one I love and has a good association.

Another part of my process includes wearing clothes that are comfortable and messy–ones that I don’t worry about getting paint on.  I also allow a little time before I create something to think about the inspiration behind my session.  Whether it was a song or a poem or a color in nature that I saw that day, I try to hone in on what brought me to my table to create.  Knowing the ‘why’ makes it easier to break through when I hit a block.

I hope this inspires you if you need help figuring out the creative process; using the senses is a great way to start and you can expand on it from there.  Just keep in mind, it’s a fluid practice and it’s always changing!  Go with what moves you forward at the moment and enjoy whatever shows up.

Love, Steph


The Creative Process: What Works For Me2018-03-29T20:23:05-04:00

How To Make Time To Make Art

Click through to get 7 simple ways you can make time to make art. Because sometimes life can get in the way of doing even our most favorite things! Come on over and check out the 7 simple ways to make art happen.

Click through to get 7 simple ways you can make time to make art. Because sometimes life can get in the way of doing even our most favorite things! Come on over :-)

When I first started taking my acrylics abstract painting class 6 years ago, I was soooo excited to have a structure set up to make consistent art.  I knew that every week, no matter what else was happening in my life, I would always have those 2 hours to create.  I didn’t have to make time to make art, it was already set up for me!

Fast forward to today, where I have a 15 month old, a husband and various other obligations.  My time is rarely my own and I’m usually juggling two things at once just to fit it all in. Can you relate? Even the most productive + talented creatives talk about the struggle of just getting to it.  And we forget that the creating part actually starts way before you’re physically sitting down with the tools–it starts with a state of mind and mentally getting in the flow of creating.

So when I found myself at a total standstill with making art, I knew I needed a new system.  I needed a better way to carve out the time.  I needed a new mindset.  And the new way was going to feel different from my carefree hours long sessions of painting so I had to be flexible + willing to experiment.

Click through to get the checklist on 7 simple ways you can make time to make art. Because sometimes life can get in the way of doing even our most favorite things!

Here are 7 ways I create more art, hopefully they will get you creating, too:

Leave work out where you can see it and it is accessible.

Leaving your supplies and a piece in progress out on a table where you can see it, makes it easier to pick up and continue creating.

Create a mood board.

Pinning pictures you love and any other visual cues that inspires you to a board will fill your creative well.  When you see something that sparks a ‘yes!’ in you, tack it up.  Refer to your board when it’s time to create and you will instantly get in the mood.  And if you don’t want to create a physical board, Pinterest is a great alternative.  You can make a virtual board that will inspire you just the same.

Keep a pen and notepad with you wherever you go.

I have found that inspiration always strikes when I’m relaxed and not thinking about creating anything!  So the best way to capture the muse is to write it down–write the words that spark excitement or make a sketch to capture the moment–writing down that feeling will help you come back to it later.

Expand the creativity in things you already do.

Everyday you are creating more than you realize.  Whether it’s cooking, baking, gardening or DIY projects in your home, you are putting your crafty ways to work.  Even dressing yourself in a creative way can be exciting!  When you’re more present during your day, you will recognize all of the un-traditional ways to get inspired.  Start appreciating those and let them be the fuel to stimulate you even more.

Create in micro-blocks. (Don’t wait for that big chunk of time.)

The longer you wait to create, the longer it takes to make the time.  It’s the perfect form of self sabotage!  Gah.  So why not try using the micro blocks that pop up during the day?  In the car before picking up the kids, sketch a little something in your notepad or on a random piece of paper.  Or when you’re waiting for dinner to be ready, plan out your next blog post or creative venture.  The big chunk of time may never come, just do it now.

Every time you reach for your phone, pick up a pen/crayon/marker/brush instead.

We waste sooooo much time surfing the web and on social media (I know I do!)  Use that time to capture a few free moments of art-making that you’re craving.  Play a game with yourself for a week and replace that time you usually pick up your phone to browse the web with other creative activities–see how much you can actually create!

Let yourself off the hook.

Don’t sit down with the intention to create your next masterpiece!  That kind of pressure can kill even the most motivated artist.  Just enjoy the creative process, inch by inch, and let it happen–you might be pleasantly surprised.

Click through to get the checklist on 7 simple ways you can make time to make art. Because sometimes life can get in the way of doing even our most favorite things!

Want to show me + other creatives that wonderful work you DO make?  Join my private Facebook Group for creatives here.

Love, Steph

How To Make Time To Make Art2018-10-08T21:18:04-04:00

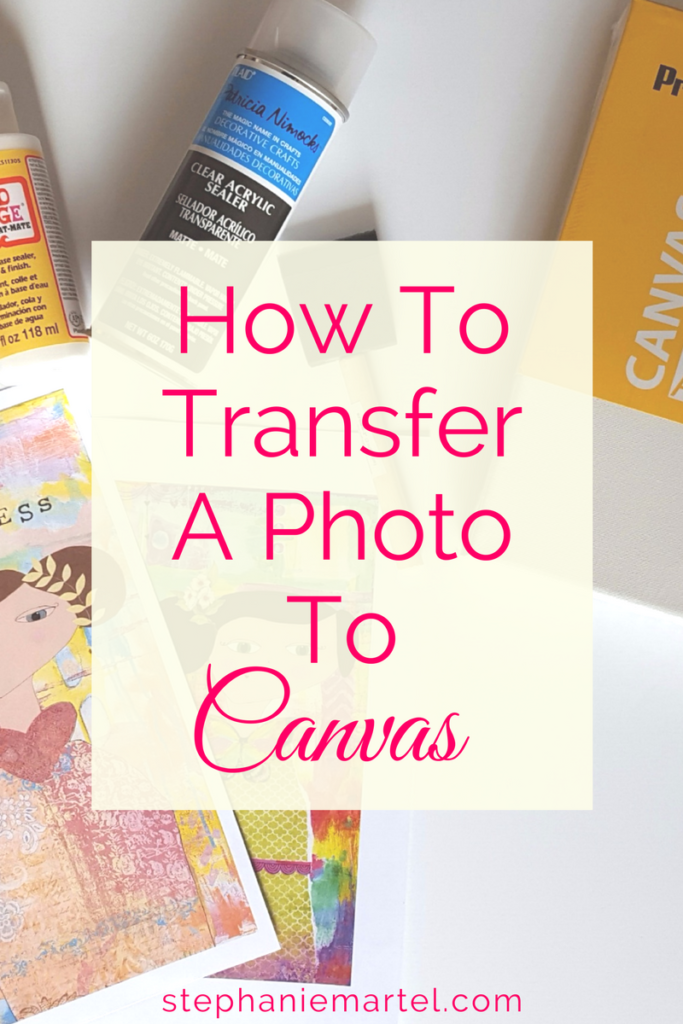
How To Transfer A Photo To Canvas

These are a series of helpful hints on how to do something art + growth related. Come over and take a peek!

This is a series of helpful hints I want to share with you that I’ve learned along the way in my art journey.  For more How To’s click here.

Come on over and check out how to transfer a photo to canvas. Click through for the quick and easy step-by-step instructions.

If there’s one thing I love, it’s to learn how to do something myself that I usually pay a bunch of money for. Recently I bought a canvas that a company will print a picture on for you.  And it got me thinking: what if could create a picture printed canvas on my own?  With a little research, I found it’s not only doable, but it’s easy and cheaper to do it myself.  Woohoo!  Today I’m sharing the process with you, so you can do it too.

Let’s get this party started!

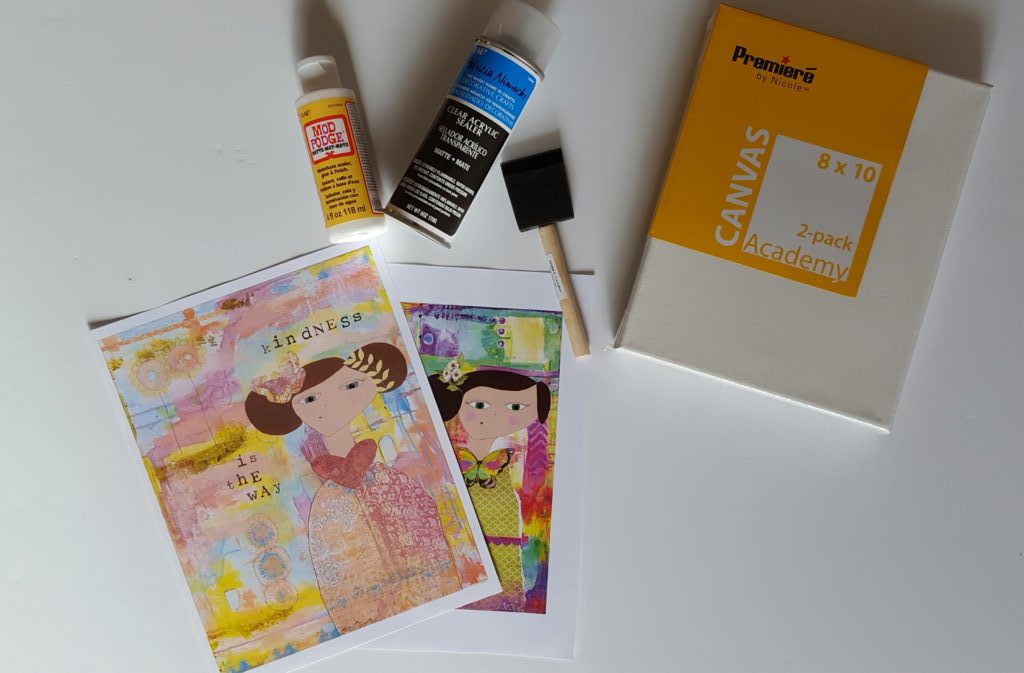
First, let’s talk supplies.  Here are the things you’ll need for the project:

  • Canvas.

Whatever size you want, but keep in mind you’ll need a print that’s somewhat the same size.

  • Laser print of image you want to transfer, on photocopy paper.

(you can get this from Staples if you don’t have a laser printer) *It’s important to remember that if there is lettering on the image, you will need a mirror copy of it so the print is going the right way when it’s transferred. (I did it the wrong way originally myself!)

  • Some kind of  medium.

Liquitex has a great one that I use a lot but you can also use mod podge, especially if you’re on a strict budget.  When you’re buying it, keep an eye on the finish; “matte” or “gloss” are the terms they will use. Consider these when you think about how you want your finished canvas to look in the end.  Matte is cool but can dull the colors + gloss will give you a shine.

  • Old credit card/used gift card for smoothing.
  • Foam Brush
  • Acrylic Sealer (Optional)

You can put a final coat on the image to extend the life of the colors and overall look.

Come on over and check out how to transfer a photo to canvas. Click through for the quick and easy step-by-step instructions.

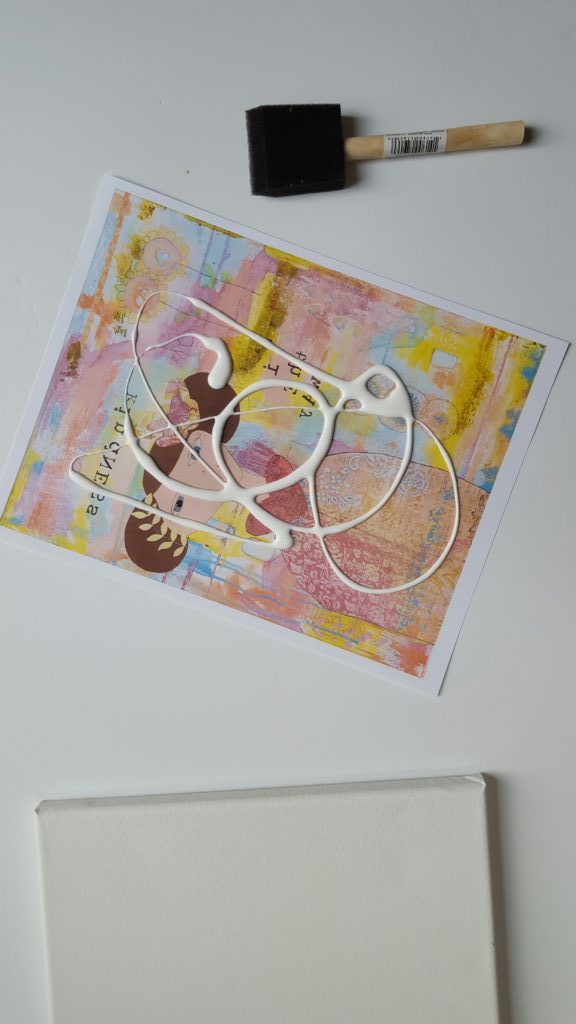
The first thing you’ll do is smear a bunch of medium on your paper print.  I used modpodge since it’s a product known for it’s ability to transfer images (and it’s cheaper which always helps).  I just squirted a bunch on the paper and used the foam brush to move it around. You want to make sure that you coat the liquid evenly on the paper and apply it a little thicker than you’re comfortable with.

Come on over and check out how to transfer a photo to canvas. Click through for the quick and easy step-by-step instructions.


Come on over and check out how to transfer a photo to canvas. Click through for the quick and easy step-by-step instructions.

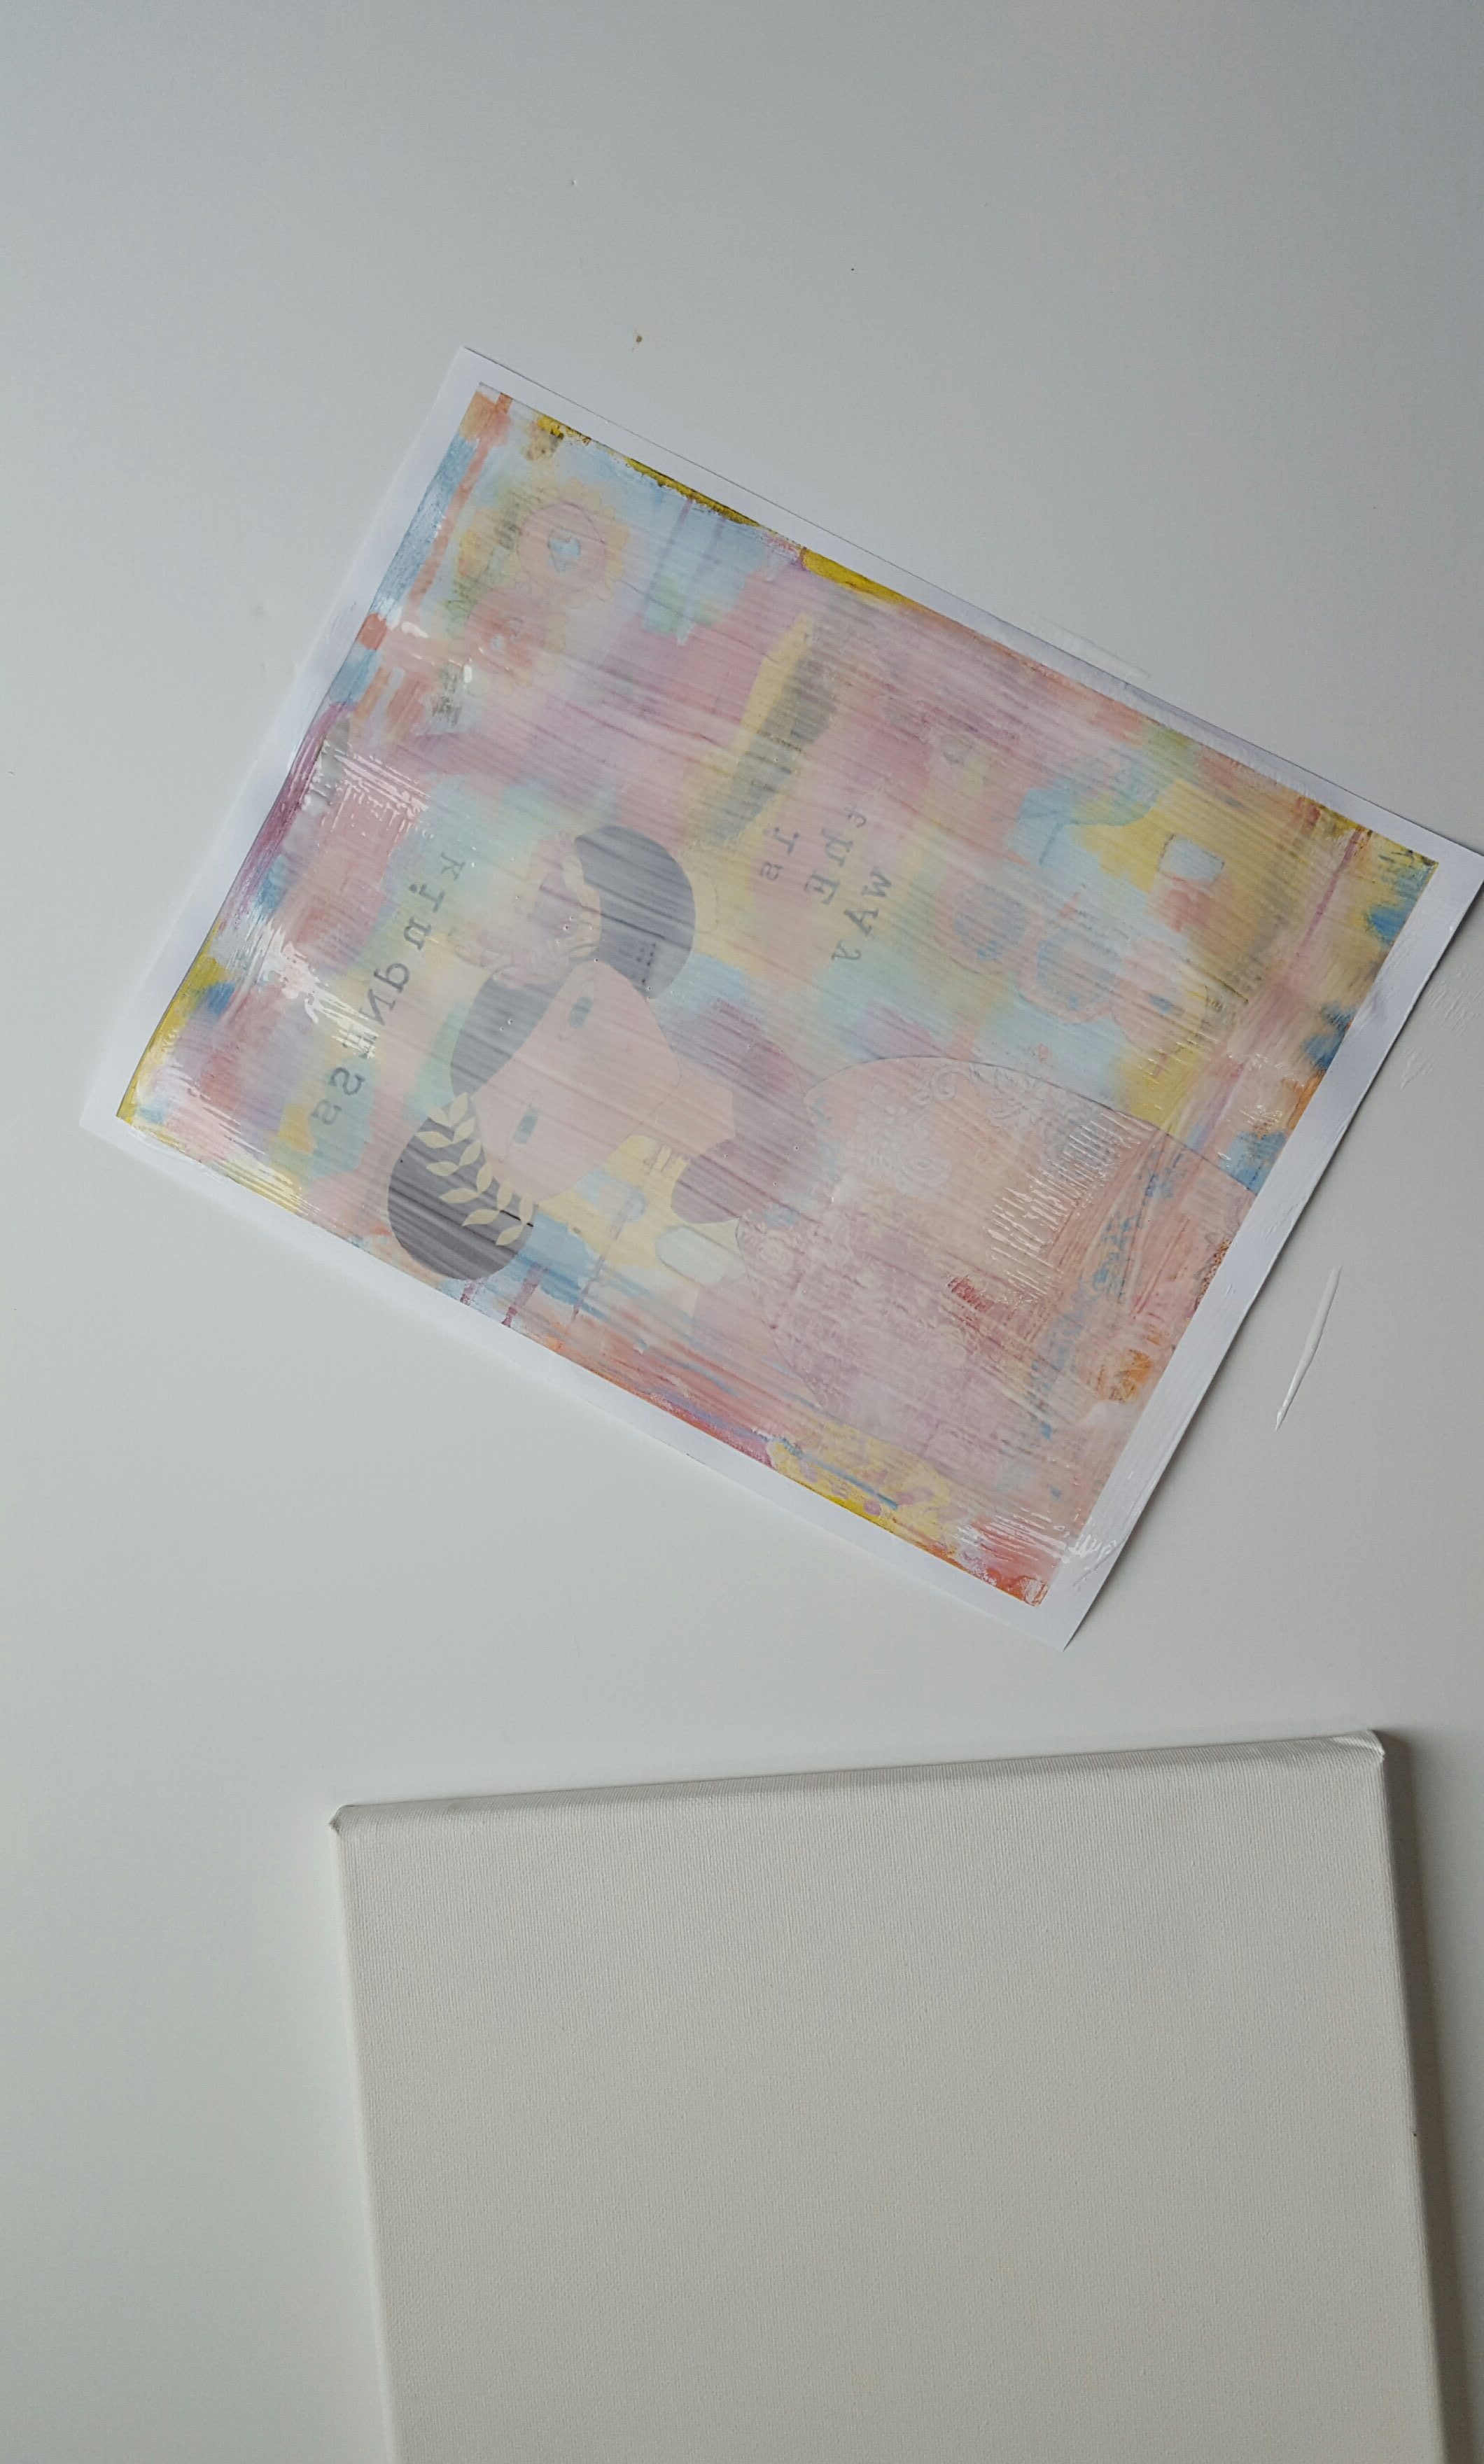
After I applied it, you can see that the image is barely visible through the layer of modpodge.  That’s what you want.  When everything is evenly coated, take the paper and lay it centered on your canvas.  Then, as best you can, smooth out any air bubbles with your credit/gift card.  A little warning here: be gentle.  The paper is wet and will rip easily if you’re not careful so just glide that card around and get the paper as flat as you can against the canvas.

Come on over and check out how to transfer a photo to canvas. Click through for the quick and easy step-by-step instructions.

If you want to turn the canvas over so that the frame is facing up, it will apply extra pressure to the paper to make sure everything sticks.  I even added some weights on top of the frame (I used candles) for good measure.

Next: you’re going to wait 24 hours.  YES!  You must wait or it won’t come out right.  The medium has to completely dry so that you can separate the paper from the canvas without creating a gooey mess.  Do it too soon and you’ll be covered in sticky paper.  Yuck.

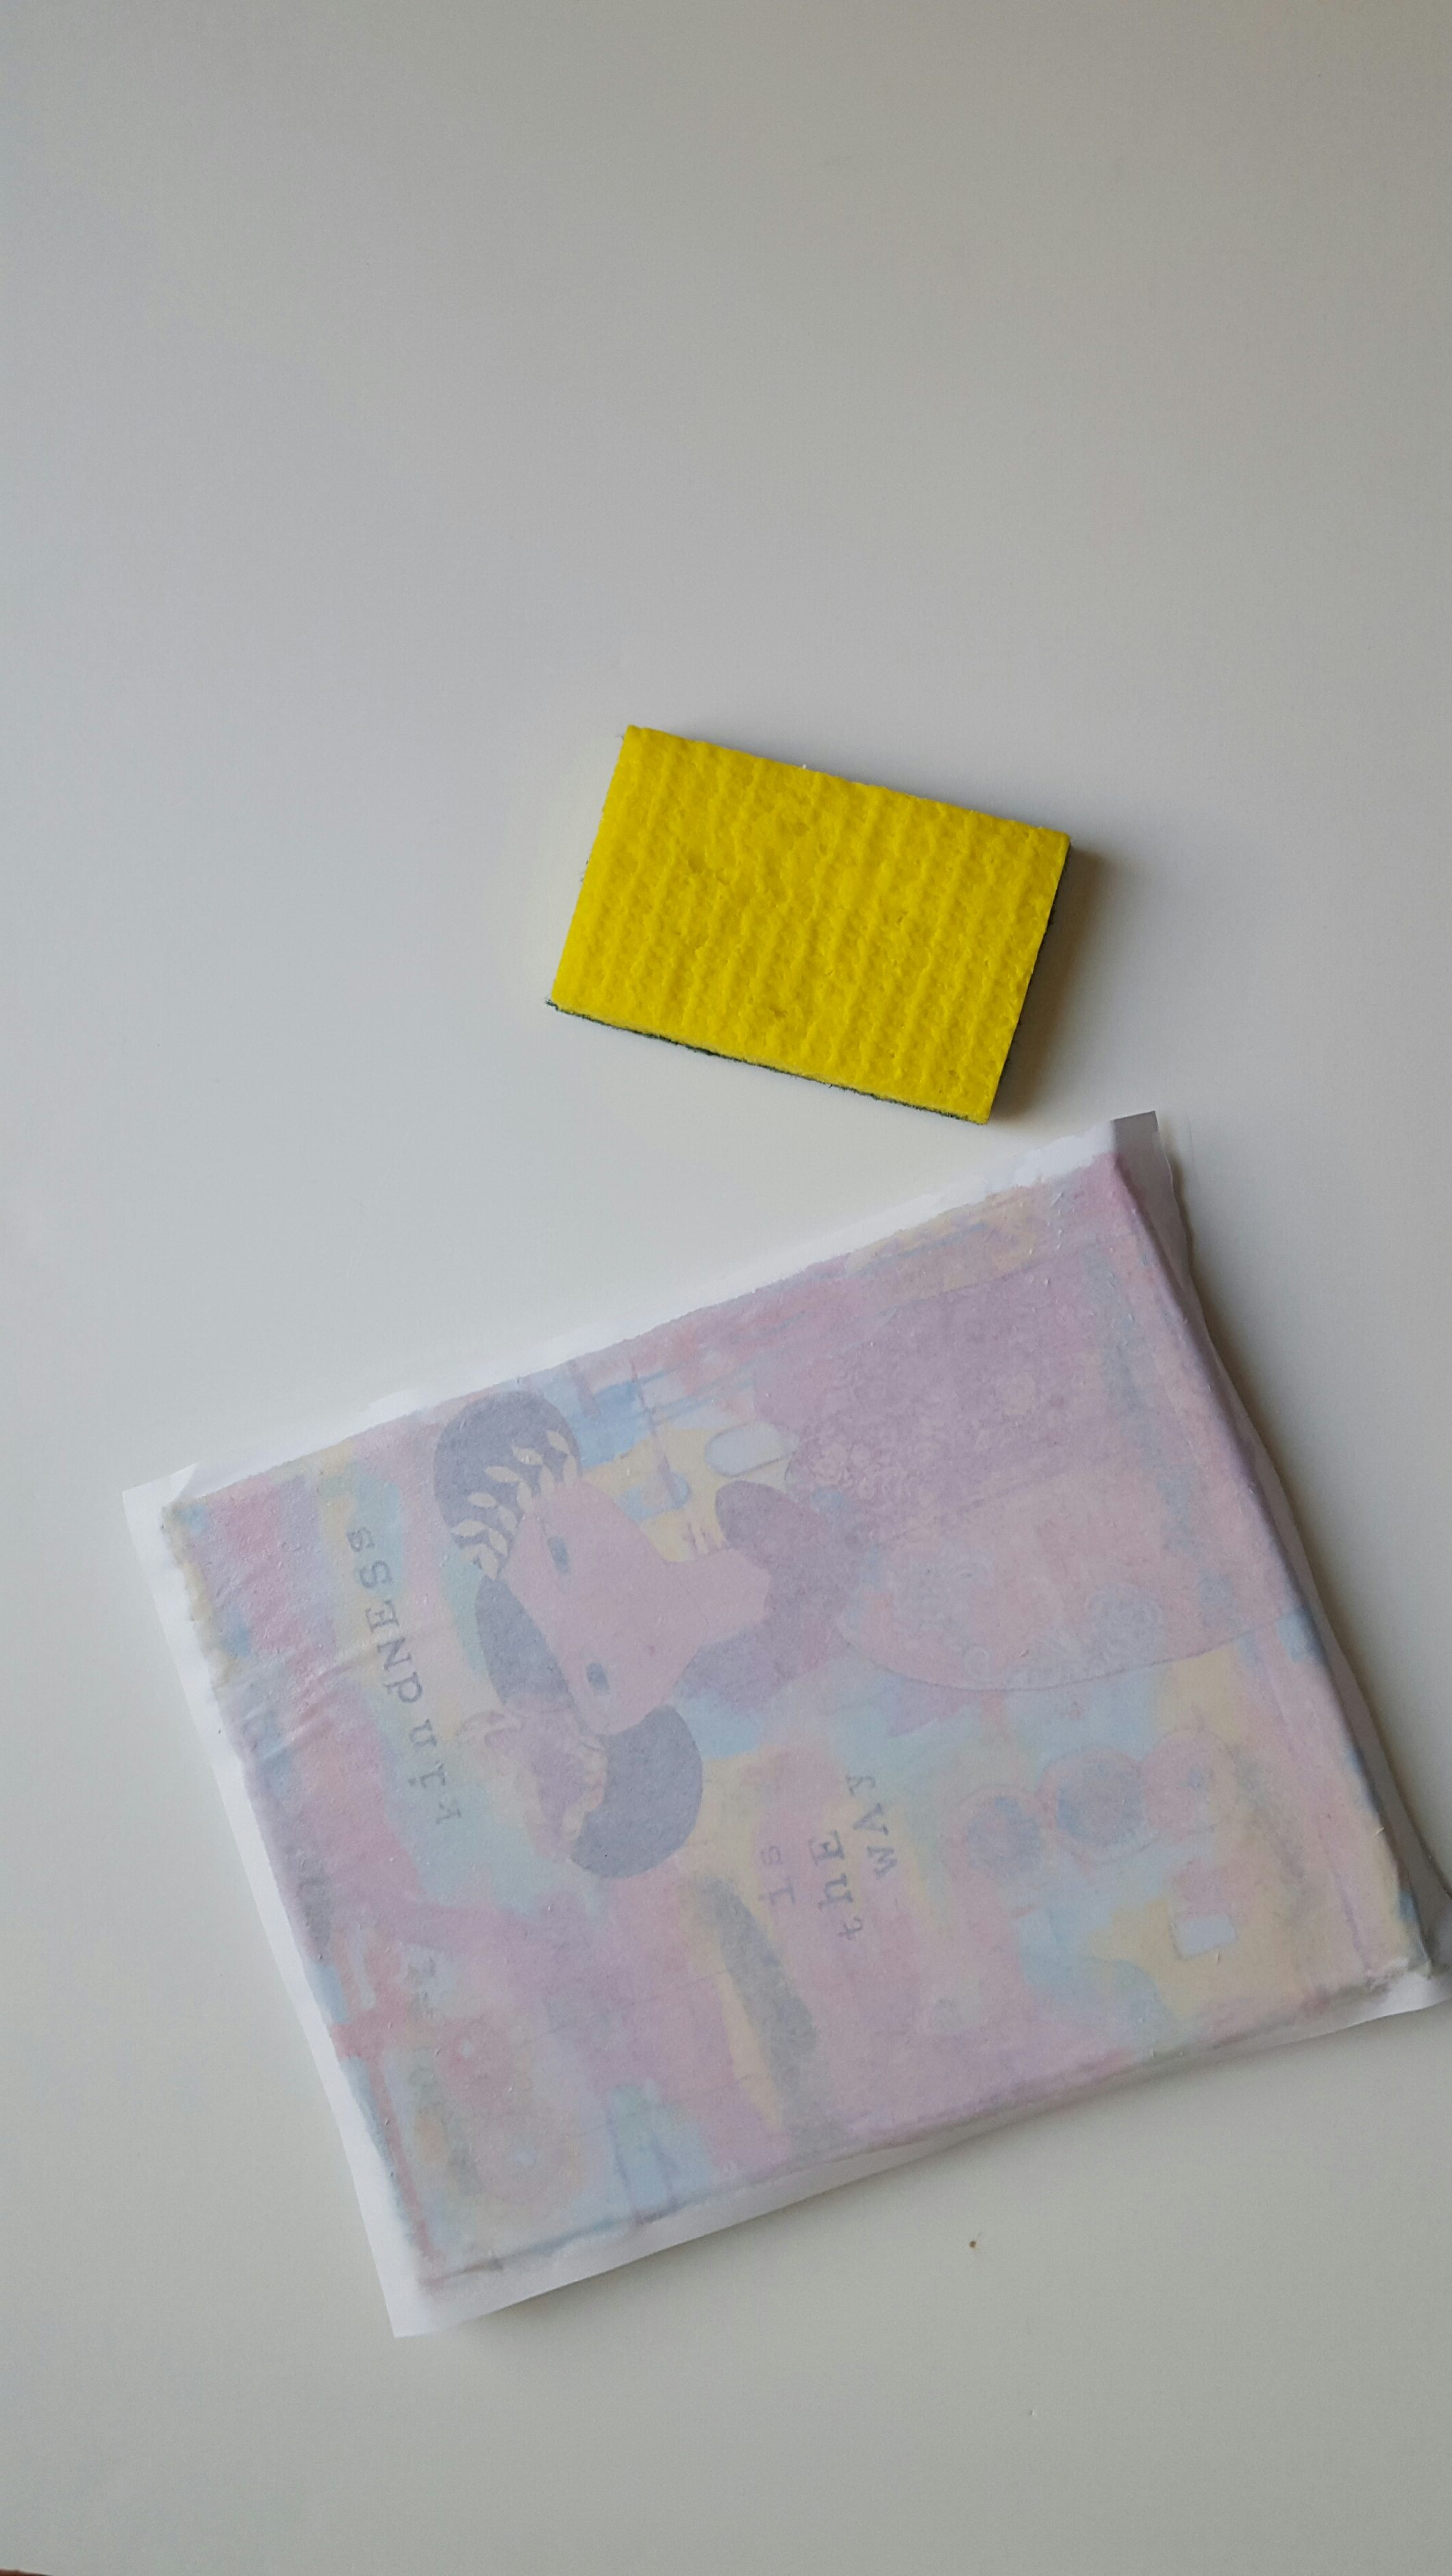
After you wait 24 hours, get your sponge really wet and gently coat the canvas with water.  Pretty soon you’ll see the image appearing through the wet paper.

Come on over and check out how to transfer a photo to canvas. Click through for the quick and easy step-by-step instructions!

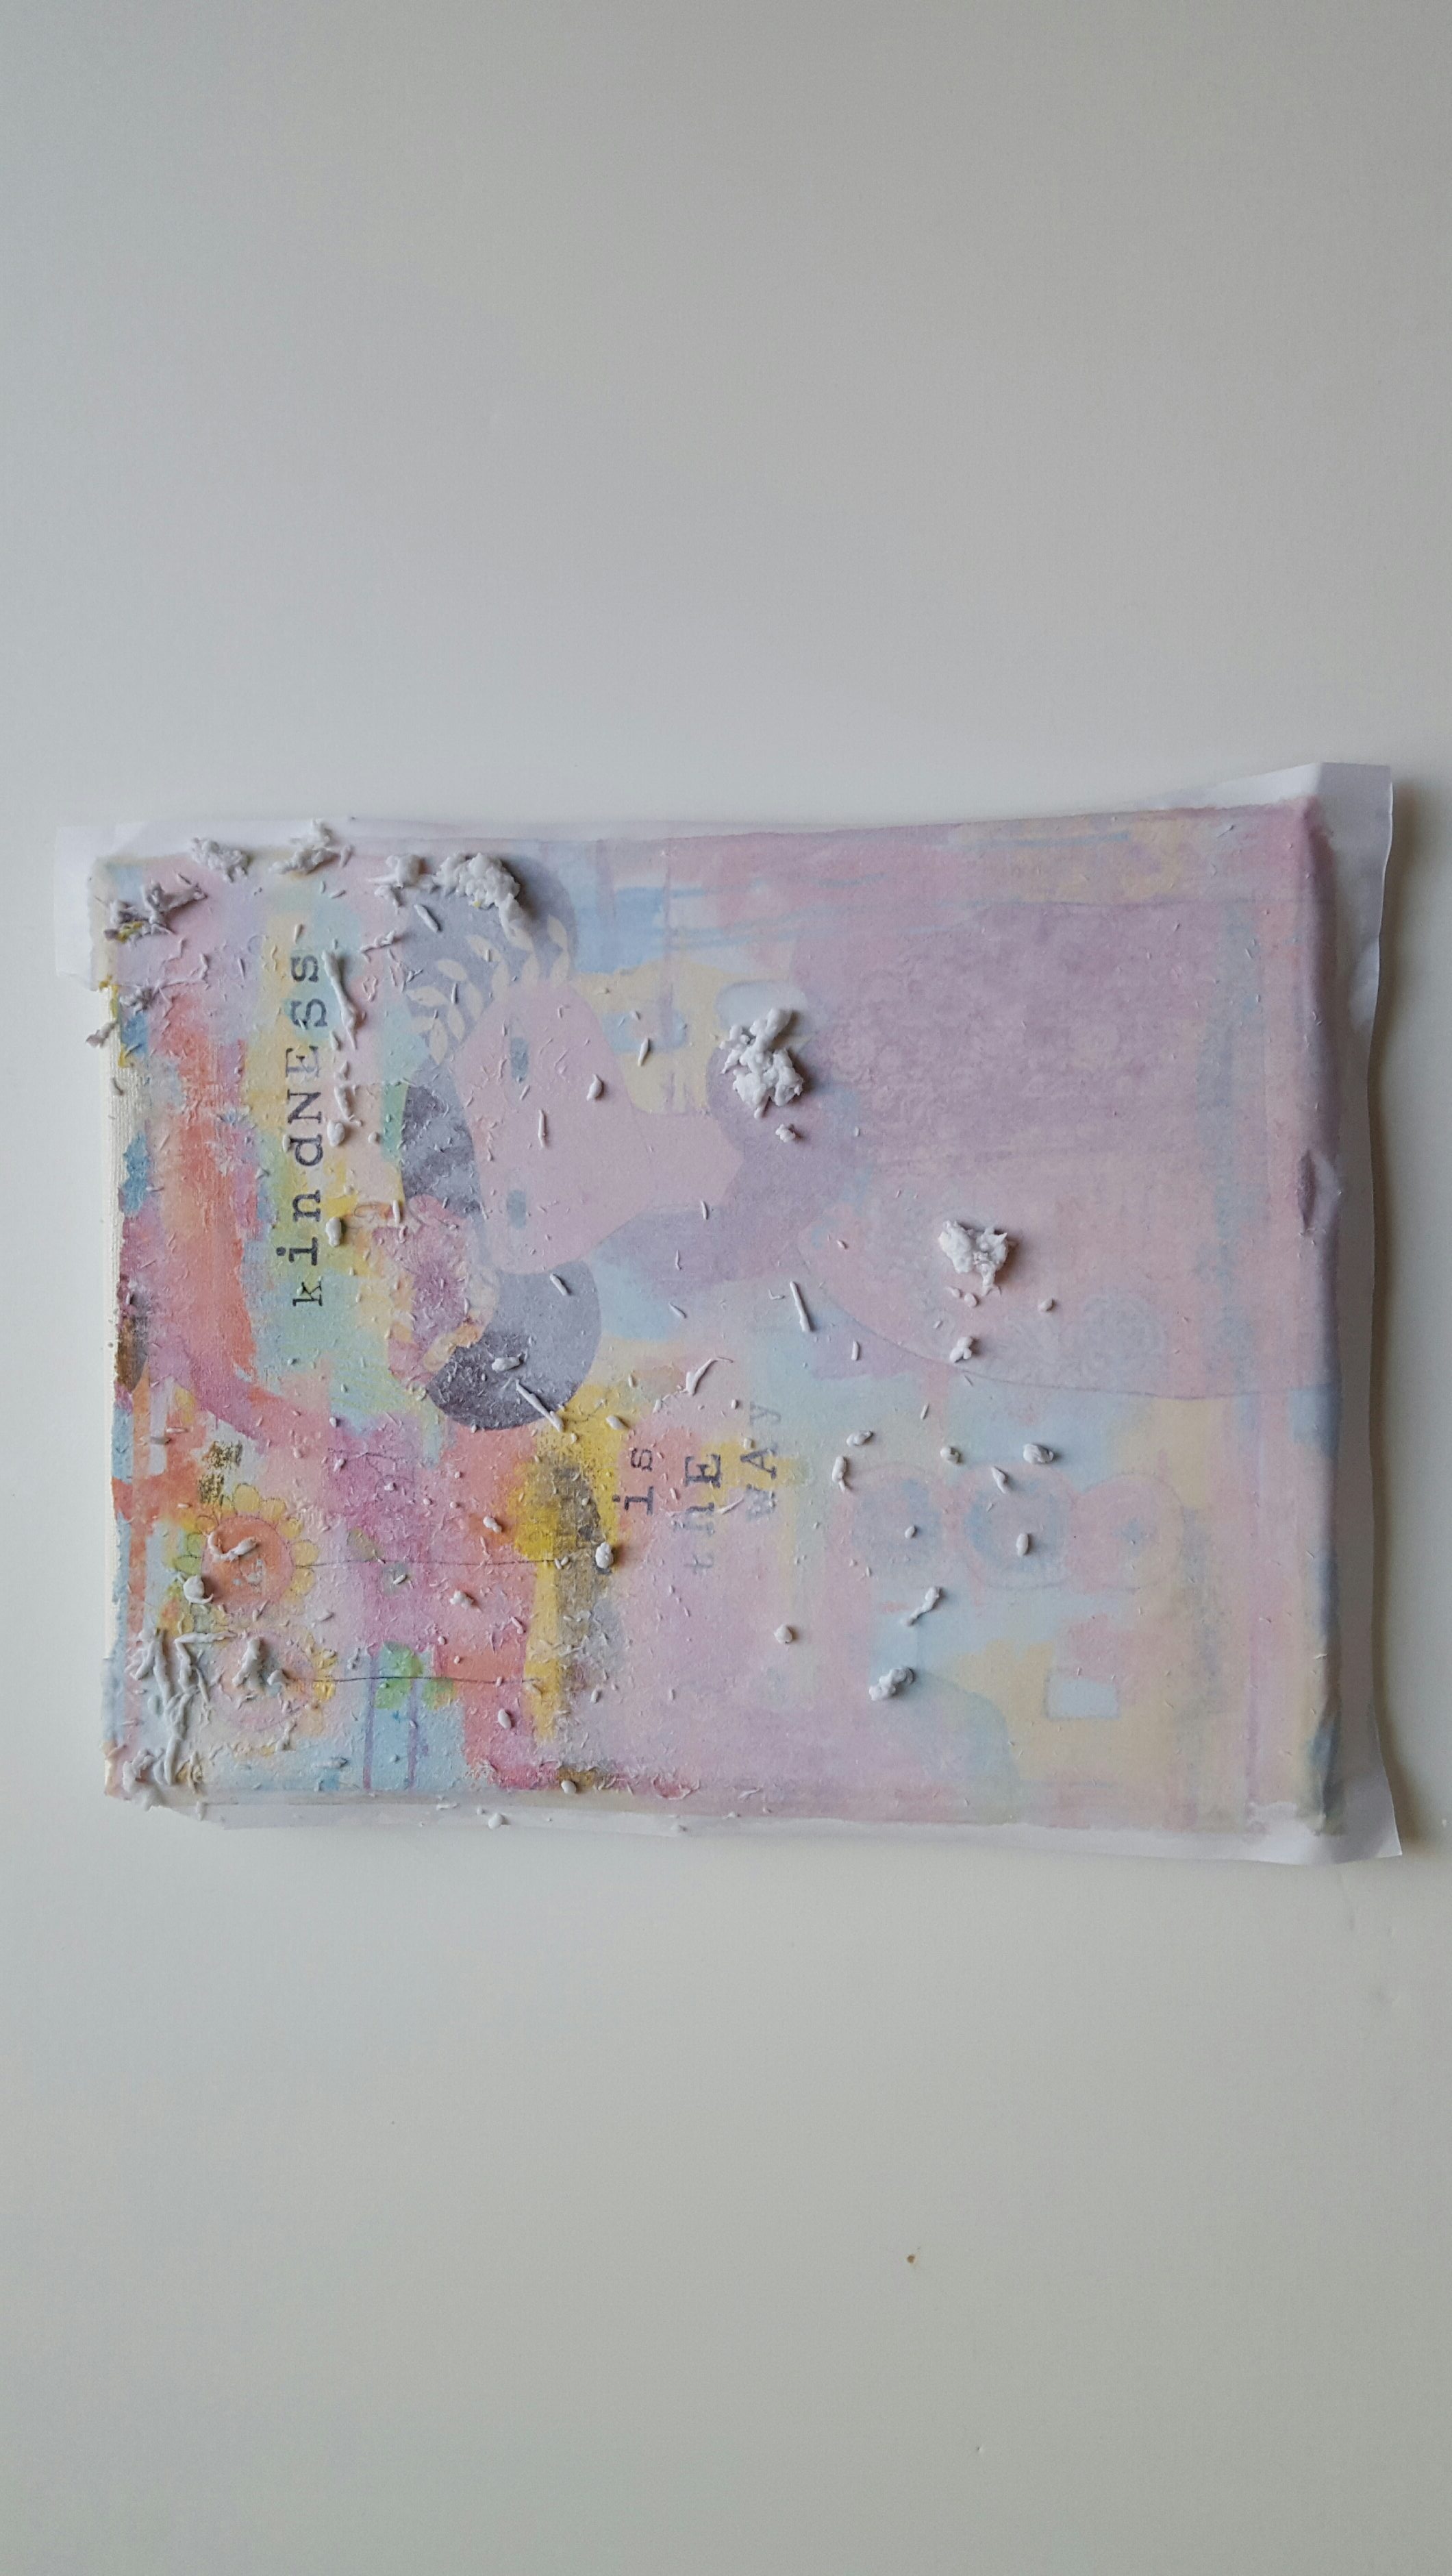
Start gently rubbing the paper off with the sponge.  It gets a little messy, but that’s how you reveal the picture underneath.  Keep wetting the paper and rubbing gently.

Come on over and check out how to transfer a photo to canvas. Click through for the quick and easy step-by-step instructions!

Eventually the paper will come off and you’ll have your image on the canvas.  Magic!

Come on over and check out how to transfer a photo to canvas. Click through for the quick and easy step-by-step instructions!

So as you can see, I tried out 2 different styles with this project: one was to use an image that was flush with the sides of the canvas and the other looks like it has a natural border because the picture was smaller than the canvas.  Which ever one you try is up to you and what kind of look you’re going for.  If you try to do the flush edged style and it doesn’t reach the edge, you can always add a little paint to make it a mixed media one-of-a-kind piece!  Just have fun with it and don’t get too crazy about making it perfect.

If the edges are a little ragged, you can either sand  it with fine sand paper or just slap a little medium on it and smooth out those edges.

I do want to show you a mistake I made though, so you don’t do the same thing:  I got a little zealous/impatient and used the scrubby part of the sponge to remove the paper.  You can see where it pulled off part of the image from the canvas. Oopsie.  But I can touch up those parts with a little paint too. And it gives it a little character, no?

Come on over and check out how to transfer a photo to canvas. Click through for the quick and easy step-by-step instructions!

If you look closely on the left side of her dress, there’s a cut out that looks a little like a butterfly.  That’s another part of my *ahem* enthusiastic paper removal, or maybe it was an air bubble.  But you know what?  I love how it looks.  Some how the ink made it’s way to the canvas, and created a multi-textured look.

Come on over and check out how to transfer a photo to canvas. Click through for the quick and easy step-by-step instructions.

So there you have it, friend!  How to transfer a photo to canvas for beginners.  It was actually really easy and didn’t take a lot of time at all!  And if you want to seal the image you can use a spray acrylic sealer OR add an isolation coat to it.

Hope you have fun trying!

Love, Steph

How To Transfer A Photo To Canvas2023-09-19T12:14:09-04:00

4 Easy Ways To Display Your Art Online (In 5 Minutes Or Less)

Want to know 4 easy ways to display your art online? Especially if you're a new artist, click through to read these helpful tips to get you started.

Even if you’re a multi-tasking master, there’s always more to do and let’s face it–we’re all crunched for time.  Especially if you are running a creative business/blog/website in addition to your everyday responsibilities or work!  So when you’re trying to get more eyes on your creative ventures,  it can mean working on it a little each day. And because of this, you need to make the most of your time.

I’m a huge fan of making small micro-movements towards a bigger goal to avoid overwhelm.  You too?  Great–here are some fantastic micro movements to make your creations more visible to others.  And some take less than five minutes!  Let’s get started, shall we?

Register for your own real estate

Social media is fantastic, but your know what else is fantastic?  Owning your own pictures + words.  Because when you post pictures or thoughts on social media, it’s no longer just yours. It’s Facebook’s or Instagram’s or whatever outlet you’re posting to, and they can take it for their own use or they can also just eliminate your profile altogether. #yikes So it’s important to have your own little corner of the world in the form of a website or blog to maintain your own intellectual property.  It’s as simple as buying a domain name and setting up a basic site.  Then you can post your work and your thoughts to your heart’s content without the fear of losing your information!

When you buy your name as a domain (or your company name) it’s yours forever until you let it expire or you sell it.  Even if you don’t have time to create a blog or website now, buy your name immediately so when you are ready, you have the address rarin’ to go.  Google Domains is an easy way to buy a domain and so is namecheap.  Give it a try!

Start collecting emails

When you have a list of emails, you can send your creations out to the exact audience that is interested in seeing it (otherwise, they wouldn’t sign up for your list!)  Your email can be as simple as sending a newsletter that includes images of your work, or pictures from behind the scenes of what you’re creating.  Because one of the great things about signing up for a newsletter, is learning more about the person behind it.  If your reader feels personally connected to you, they are that much more likely to share your work either on social media or in their own newsletter.

SO, in order to collect emails, you need to sign up with an Email Service Provider.  There are TONS to choose from, but I find Mad Mimi to be simple and easy to use.   They have a free option for up to 100 contacts, so you can try it out first before committing.  And you can literally create your first newsletter in under 5 minutes.

Pin your work

If you are not already on Pinterest, run don’t walk, and sign up immediately.  It’s not only a treasure trove of amazing imagery but it’s also a great way to be seen.  If you create an eye-catchy graphic and others pin it, you can boost your blog or shop views in a matter of hours.  And that can lead to more fans + sales. Hooray!

Click through to get access to my free library of helpful tools, including this worksheet on how to create a good graphic!

Join a Facebook Group

Facebook groups are having a moment right now (I have my own group for creatives if you want to check it out here).  They kind of feel like a continuous cocktail party–you can jump in and out of posting in the group when you have time and you can share your experience or opinion on topics that interest you.

There’s pretty much a Facebook group for every topic, you just need to do a little vetting to make sure it’s a community that is positive, fun and one you want to be a part of.  If you find the right group, it will not only connect you with like-minded people but it will inspire you to make more work that you can share with them on a regular basis.

So there you have it: a few easy ways to keep that sharing momentum going.  And if you’re just getting started, don’t worry about being found–just keep working on being seen.

Love, Steph

P.S. Not sure how to create those eye catchy graphics you see on Pinterest?  Get access to my resource library and download my worksheet: 5 Elements to a Good Graphic.

Click through to get access to my free library of helpful tools, including this worksheet on how to create a good graphic!


4 Easy Ways To Display Your Art Online (In 5 Minutes Or Less)2018-10-08T21:21:45-04:00

How Color Influences Your Audience

These are a series of helpful hints on how to do something art + growth related. Come over and take a peek!

This is a series of helpful hints I want to share with you that I’ve learned along the way in my art journey.  For more How To’s click here.

Want to know how you can influence your audience with a simple color choice? Click through to learn about complimentary colors and get a free PDF color chart!

When was the last time you were really drawn to a piece of artwork or a graphic?

Most likely the color combination they used made you feel a certain way.  It’s a nifty little trick you can use to attract your audience too!

I’ve always been fascinated with color and how it can affect even the simplest of things.  I’m a big fan of black clothes because it makes getting dressed so easy but when it comes to painting and social media?  The more color the better.

But what if you’re a newbie and don’t know how to blend one color with the other to create the mood you’re looking for?  It’s something easy to learn and it becomes second nature after a while; let’s start with the basics.

Red, blue and yellow are primary colors.  All of the other colors are a combination of these three.

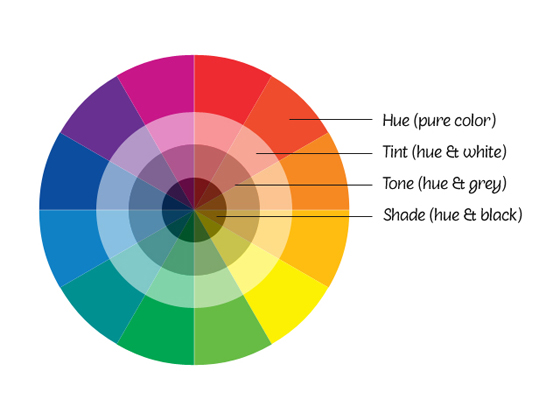
When you mix red and yellow, you get orange (see in the wheel below how it’s in the middle of those two colors?)  Mix blue and yellow, you get green; mix red and blue, you get violet. All of these colors that are produced–Orange, green and violet–are called secondary colors because they’re made from the primary ones.
Complimentary color wheel colors

If you look at the wheel, the complimentary color is whatever is across from it.   Complimentary colors go well together because they don’t share any common colors but create contrast and interest.  Some people say that using complimentary colors seems to makes the image appear like it’s vibrating. #Whoa.

But something to keep in mind when you’re using complimentary colors is: don’t give them an equal 50/50 distribution because that can feel a little obnoxious to the viewer–pick one dominant color and then use the other for accent + contrast.  So the breakup tends to be more like 80/20 in an image, or even 90/10.  Just a touch of contrast can be very powerful.

Want to know how you can influence your audience with a simple color choice? Click through to learn about complimentary colors and get a free PDF color chart!

So why does all of this matter?

When you’re creating something to convey a message to others, whether it be through your art or a social media/blog graphic, you want to take color into consideration.  People inherently react emotionally to images, even if it’s just a simple color. And depending on the message you want to send, you can pick your colors accordingly to create the emotion you’re trying to convey.

Here are some common perceptions/meanings of different colors:

  • Red: affection, power + sometimes fear
  • Orange: comfort, warmth + motivation
  • Yellow: Joy, Happiness + Confidence
  • Green: Balance, Harmony + Health
  • Blue: Calm, soothing + sometimes cold
  • Purple: luxury, mystery + spirituality
  • Pink: compassion, caring + understanding
  • Brown: structure, security + protection
  • Black: control, independence + sometimes evil
  • White: purity, innocence + cleanliness

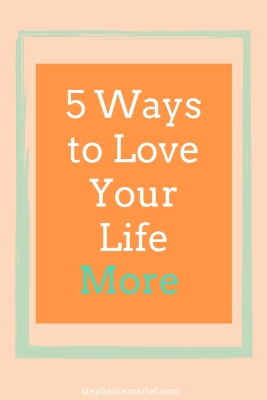
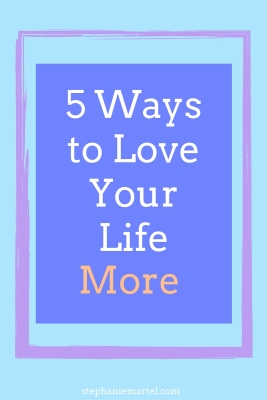
So say you want to make a graphic for your blog post, titled: “5 Ways To Love Your Life More”.  You want to attract people that are interested in enjoying themselves + are interested in growing from your tips; these people will probably will be a little more open minded, yes?  If you look at the right half of the color wheel–those are the warm colors.  These colors tend to exhibit energy, passion and joy.  They exude “warmth”.  The left half contains the cool colors which give off the feeling of calmness and professionalism.

From this insight, you’d probably want to lean more towards using the warm tones for your graphic–maybe a peachy/orangey background as the dominant color to set the overall tone.  You want to draw people in by making them feel warm + fuzzy and warm colors would do the trick.

Here is a simple visual:

Create simple graphics like this using Canva! Click through for access to Canva For Creatives an ecourse for beginners.

I intentionally kept this graphic very plain to get the message across about the colors used; you can see how you might attract more people to your blog/site who are looking for some comfort if you use the orange toned graphic.  It’s warmer and more psychologically cozy, even with the touch of contrasting color.

And even though the blue toned one says the exact same thing it’s sending a different message, isnt it?  It’s cooler, it’s calm, but not as welcoming because we subconsciously associate blue toned colors with icy, separateness.  Not exactly the warm fuzzy we were looking for 🙂

Of course sometimes our personal preference will override everything, so it’s ok if you liked the blue graphic better!  This is just a basic guideline to show you the difference of emotions that you can create for your online presence.

It becomes a little bit of a fun game to pair up different colors together intentionally–you can experiment by creating 2 different graphics like I did and see which one gets more of a response on your blog or profile.

Just have fun with it!  It’s all a work in progress.

Love, Steph

P.S. Want to dive a little deeper into this topic and learn how to create your own graphics on Canva?  I’m creating an ecourse for beginners just like you!  Click the banner below for more information.

Get notified when Create In Canva is available!

How Color Influences Your Audience2018-10-08T21:23:17-04:00
Go to Top